Diversified Enterprises
  • Home
  • Intro
    • Employment
  • Products
  • Tech Tips
  • Shipping
  • Contact
  • Home
  • Intro
    • Employment
  • Products
  • Tech Tips
  • Shipping
  • Contact

Tech Tips

Need Some Help?


Welding sheet metal

  • Weld using a neutral flame (just off feather)
  • 4 to 4.5 PSI equal oxygen and acetylene.
  • Lock trigger in off position.
  • A light preheat to knock the chill out and stress relieve the metal
  • Weld up to 1/2″ thick metal. Thicker metals require longer preheating.
  • To prevent distortion in the metal leave a 1/16″ to 1/8″ inch gap between the pieces being welded.
  • No Flux is required.
  • Rusty or dirty is not a problem.
  • On large pieces tack weld about every 1″ inch to 1 1/2″ inches.
  • On material 1/8″ or thicker requires grinding a V bevel on the edges.
  • Weld using the tip of the flame. Lower your flame and rod onto the weld together, walk the flame up and down the rod washing the molten filler back into the puddle. Thicker material may require a slight oscillating motion to keep both sides red hot.
  • Select your Rod according to purpose.
  • Generally copper coated TIG rods.
  • If your doing auto body sheet metal use RG-45 / RG-60 TIG rods, they hammer and dolly very nicely.
  • You can use a coat hanger, but not recommended.
  • You can also shear small strips of excess material and use as a welding rod.
  • Eletrodes may be used by knocking off the flux.

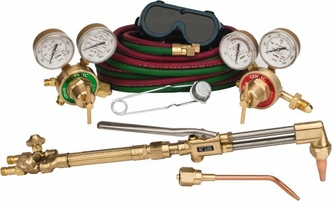
Setting up the torches

Picture
  • When setting up your torch please insure you read the
    instruction manual and understand all the safety and warning pages. Insure that you have installed the flash back arrestors.
  • Lock trigger in off position.​
  • Use the #3 tip (For set up and heating metal for bending or shaping)
  • With your tanks open and output regulators closed, open the guns oxygen and acetylene valves turns.
  • Lightly crack the acetylene regulator enough to light the torch.
  • Slowly open the acetylene regulator valve until you get about a two foot flame and there is no black smoke. Your regulator output reading should be 4 to 4.5 PSI.
  • Lightly crack the oxygen regulator and slowly open until you get a neutral flame (Best viewed with goggles on). As you turn the oxygen up you will see an outer feather start to drop down. Keep slowly opening until the feather just disappears. The flame should be about 1/2″ to 9/16″ of an inch. That is a neutral just off feather flame that is extremely critical for all cutting and welding applications.
  • If you have 50′ hoses you need to increase your pressure 1 to 2 PSI
  • Use quality regulators that do not fluctuate in pressures, as this will only corrupt your cutting and welds.
  • Using the Cobra low pressure regulators is much easier. With the gun valves and regulators closed , open your acetylene1/4 turn and open your oxygen.
  • Set each one to 5 PSI. They will drop down to 4 PSI once you start using the Torch.

Welding Stainless steel

  •  The only metal that requires a carburizing flame (acetylene rich)
  • Weld up to 1/4″ inch ( very hard alloy )
  • 4 to 4.5 PSI equal oxygen and acetylene.
  • Lock trigger in off position
  • Increase the gun acetylene valve (or decrease oxygen) till
    you have an outer secondary cone that is about twice as long as the inner cone (1/2″ to 9/16″).
  • A light preheat to knock the chill out and stress relieve
    the metal
  • Weld with the tip of the inner most cone. To prevent distortion in the metal leave a 1/16″ to 1/8″ inch gap between the pieces being welded.
  • No Flux is required.
  • Use a standard TIG rod closest to your identified alloy of
    stainless steel.
  • The proper technique is to walk the inner most cone up the
    rod and back down washing the molten filler back into the puddle. Do not use oscillating motion, just up and back down.
  • The weld and discoloration will grind clean and buff right out.
              Having trouble identifying the steel?
              If it is magnetic, a 308 or 309 TIG rod may work well.
              If non magnetic, a 308 or 316 TIG rod may work well.
              You can also shear excess metal off and use as a welding rod.

Welding Cast iron

  • Weld using a neutral flame (just off feather)
  • 4 TO 4.5 PSI equal oxygen and acetylene.
  • Lock trigger in off position.
  • Requires preheat and post heat to prevent material from
    cracking.
  • An oven or outdoor barbecue is ideal for preheating and
    post heating.
  • Insert your part and preheat to about 500 degrees.
  • After welding return it to the oven or barbecue and slowly
    turn the heat down, or place it in an insulated box and let it slowly cool.
  • Flux required.
  • You will need a Cobalt blue lens to view your weld through
    the flux burn.
  • After preheating your part, preheat the cast iron filler
    rod with the torch and dip it in the flux. Start by melting the base material until it begins to puddle, dip the rod and walk the flame up melting some filler, move the rod out, work the
    puddle allowing the filler to molten and sink into the base material, as you move forward dip a little filler rod, heat, let it sink, then build.
  • When done, do not remove the flame abruptly, but
    rather pull back and work the torch around the general weld working outwards trying to evenly heat the entire part as much as possible.
    (Slightly turn up oxy-acetylene if needed.)Post heating and slow cooling is very critical for success. Insure you have some type of insulated area or a way to allow it to cool very slowly.

Welding Aluminum

  • Weld using a neutral flame (just off feather)
  • 4 TO 4.5 PSI equal oxygen and acetylene.
  • Weld from .020 up to 1″ thick casting
  • Lock trigger in off position.
  • A light preheat to knock the chill out and relax the metal
    is required.
  • Thicker cast parts require preheating to 300 degrees and
    post heating the same way as cast iron, just not as hot, to prevent cracking.
  • Flux required
  • You will need Cobalt Blue lens to view your weld through
    the flux burn.
  • The aluminum will not turn red hot like metal but a puddle
    will form that looks like jello. Dip the rod in the puddle and remove, dip and remove as you slowly work up the weld (Do not overheat)
  • When done, (especially with cast) do not remove the flame
    abruptly, but rather pull back and work the torch around the general weld working outwards trying to evenly heat the entire part as much as possible.
  • Post heat your thicker cast parts (see Cast Iron)

Welding Chrome-moly

  • Weld using a neutral flame (just off feather)
  • 4 TO 4.5 PSI equal oxygen and acetylene.
  • Lock trigger in off position
  • A light preheat to knock the chill out and relax the metal.
  • Weld up to 1/2″ thick metal. Thicker metals require longer
    preheating.
  • To prevent distortion in the metal leave a 1/16″ to 1/8″
    inch gap between the pieces being welded.
  • No Flux is required.
  • On large pieces tack weld about every 1″ inch to 1 1/2″
    inches.
  • On material 1/8″ or thicker requires grinding a V bevel on
    the edges.
  • Weld using the tip of the flame. Lower your flame and rod
    onto the weld together, walk the flame up and down the rod washing the
    molten filler back into the puddle. Thicker material may require a slight oscillating motion to keep both sides red hot.

Cutting sheet metal

  • Cuts up to 1/4″ material
  • Use the Under Cutter Attachment
  • 4 TO 4.5 PSI equal oxygen and acetylene
  • Turn trigger with arrow pointing upwards
  • Set a neutral (just off feather) with trigger depressed.
  • Thick materials require preheating
  • Adjust oxygen for thicker material
                      1/4″ use 8 to 10 PSI
                      1/8″ use 6 PSI
                      22 GA up to 18 GA use 4 to 4.5 PSI
  •  When using the Under Cutter you push the torch away from you as you cut.
  • The metal only needs to be red hot when starting the cut.
  • Keep the Under Cutter (oxygen) very close, you can even
    lightly drag the Under Cutter on the surface as you push forward.
  • Keep your eyes on the Under Cutter while shaping your cut,
    not the torch.

Cutting thick steel

  • Cut up to 1″ inch thick steel
  • Use the Over Cutter Attachment
  • Turn trigger with arrow pointing upwards
  • Set a neutral (just off feather) with trigger depressed.
  • Adjust oxygen for thicker material
                    1″ use 21 to 25 PSI
                     1/2″ use 15 PSI
                      1/4″ use 8 to 10 PSI
  • When using the Over Cutter, you pull it towards you.
  • May be very hot on your hand, wear gloves.
  • Install the wheel guide for long cuts.
  • Keep the copper tip (oxygen) vertical and very close,
    between 1/16″ and 1/8″ up off the metal. (Closer is better)
  • Preheat the metal to get the chill out.
  • Begin by getting the start point red hot and depress the
    trigger.
  • The metal only needs to be red hot when starting the cut.
  • Slowly draw the torch towards you as it cuts.
  • Watch the oxygen tip (keeping it vertical and close), and
    not the torch flame.

1-877-34-COBRA

Picture
Canada's Distriubutor for the DCH 2000 Cobra Torch
CONTACT US
Diversified Enterprises
1-877-34-COBRA 
(1-877-342-6272)
diversifiedapp@hotmail.com
HOME
INTRO
SHOP
TECH TIPS
SHIPPING
EMPLOYMENT
CONTACT
Secure Shopping
We accept
Picture

Copyright © 2022 Diversified Enterprises Inc. All Rights Reserved  l  Site Egami Creative